Saturday, December 16, 2017

Broken Korean Text Fix

Due to a unique character encoding widely used for Korean text in Korea, you may run into broken, unrecognizable text when opening a file (txt, smi, hwp, doc, etc) created on the Korean Windows platform.

Use Notepad++ to fix such broken Korean text. Notepad++ is an open-source software freely available to download (https://notepad-plus-plus.org). It is available for Windows only.

  1. Download and install Notepad++ on Windows.
  2. Open the original text in another text editor like the "Notepad".
  3. Copy all broken Korean text.
  4. On Notepad++, start a new blank file. 
    1. Go to Menu --> Encoding --> Character Sets --> Western Europe --> Windows 1252.
    2. Paste the copied broken Korean text on Notepad++'s new file.
    3. Go to Menu --> Encoding --> Encode in UTF-8
    4. When prompted to save the file, go ahead and save it.
    5. As the file is saved, the broken Korean text are fixed.


Wednesday, December 6, 2017

Age calculation based on today's date and birthday

To calculate the exact age based on today's date and birthday, it might be a little tricky to implement it in SQL. Below is one way to do it.
declare @BirthDate datetime = '12/1/2016'
declare @Today datetime = DateAdd(dd, DateDiff(dd, 0, getdate()), 0)

declare @age int = 
  ( CONVERT(int,CONVERT(char(8),@Today,112)) - CONVERT(char(8), @BirthDate, 112)) /10000

select @age 
/* returns 1 if today's date is 12/1/2017. */
/* returns 0 if today's date is 12/2/2017. */


Sunday, November 19, 2017

Full-Page Background Image CSS

Using CSS3, the following can be used for most modern browsers to produce full-page background image.
html {
  background-image: url('images/background-image.jpg') no-repeat center center fixed;
  -webkit-background-size: cover;
  -moz-background-size: cover;
  -o-background-size: cover;
  background-size: cover;
}
Make sure to start the style with background-image: url(''). This style should work with IE9 or above.

Tuesday, October 3, 2017

Excel Services Issues Troubleshooting (2013/2010)

After updating Excel file on SharePoint from which a chart is published on SharePoint through Excel Service webpart, you run into an error "We're sorry. We ran into a problem completing your request. Please try that again in few minutes."

Solution: give it 3-5 minutes. If the worksheet chart used to work on SharePoint webpart before and if you did not modify the data connection(s), try again later. It seems to take a while for SharePoint to handle the updated Excel files in the back-end.

If the problem persists...

1. Check if Excel Services is running.
Central Administration -> System Settings -> Manage Services on Server -> Excel Calculation Service -> Check if "Started"

2.  Check if Excel Service Application is associated to Web Application in question.
Central Administration -> Application Management -> Manage Web Applications -> Select Web Application -> Configure Service Associations

3. Check if Trusted File Location is configured for Excel Service Application.
Central Administration -> Application Management -> Manage Service Applications -> Excel Service Application  -> Trusted file location -> Add  trusted file location -> Add address as https:// and Location Type as Microsoft SharePoint Foundation -> Keep the rest as is

4.  Check if document library configured to open documents in browser.
Site -> Library -> Library Settings -> Advanced Settings -> Check for "Opening Documents in the Browser"  Use either Server Default(Open in Browser) or Open in the Browser.

5. Grant "Excel Service Account" access to SharePoint Content database via PowerShell.

$wp = Get-SPWebApplication -identity
$wp.GrantAccessToProcessIdentity("Domain\Account that runs Excel Service")

**To check for service account - Central Administration -> Security -> Configure service accounts

6. Check if SharePoint Web Services in IIS has ASP.NET Impersonation disabled.
Select SharePoint Web Services from list of available of sites. -> Select Authentication from right panel and available authentications are displayed. -> Disable ASP.NET Impersonation if enabled.


Sunday, August 27, 2017

Make Windows 10 run faster

Below are tips to make Windows 10 run faster. This is useful when using Windows 10 virtual machine on a resource-limited developer PC or laptop.
  1. Disable Windows Search service
  2. Disable Windows Update service (please perform Windows update manually from time to time)
  3. Disable Telemetry and Data Collection service
    1. Open Registry Editor
    2. Go to
      HKLM\SOFTWARE\Policies\Microsoft\Windows\DataCollection
    3. Create a 32-bit DWORD value named AllowTelemetry and set it to 0.
    4. Open Services and disable the following services.
      1. Diagnostic Tracking Service or Connected User Experiences and Telemetry
      2. dmwappushsvc
  4. Disable Windows Defender
    1. Open Registry Editor
    2. Go to
      HKEY_LOCAL_MACHINE\SOFTWARE\Policies\Microsoft\Windows Defender
    3. Create a 32-bit DWORD value named DisableAntiSpyware and set it to 1.
  5. Restart Windows 10
  6. Run .NET Optimization manually via PowerShell (this could take 10-20 min).
    1.  Get-ChildItem $env:SystemRoot\Microsoft.net\NGen.exe -recurse | ForEach-Object { & $_ executeQueuedItems }
      
  7. Restart Windows 10

Saturday, July 29, 2017

"vertical-align: middle" that works anywhere

Outside a table cell, vertical-align: middle does not work as expected. The following is a css that allows any child element to be positioned at center vertically and horizontally.

text-align: center works in most cases. However, it does not place a child element in perfect center position. It generally places the left-most edge of child element to the center horizontally, giving the look of off-to-right appearance of the child element.

.cell {
 position: relative;
 border: 1px solid #587cdd; 
 border-radius: 5px; 
 margin: 5px;
 width: 50px; 
 height: 50px;
 text-align: center;
 float: left;
 -webkit-transform-style: preserve-3d;
 -moz-transform-style: preserve-3d;
 ransform-style: preserve-3d;
}
.content {
 position: absolute; 
 top: 50%; 
 left: 50%;
 transform: translate(-50%, -50%); 
 -webkit-transform: translate(-50%, -50%);
 -ms-transform: translate(-50%, -50%);
}

<script src="https://unpkg.com/vue"></script>

<div id="app">
 <span class="cell" v-for="n in 10">
  <span class="content">{{ n }}</span>
 </span>
</div>

new Vue({
 el: '#app',
 
});

The above code will produce the following. Each square has content with dead center position: both horizontally and vertically.

Thursday, June 8, 2017

Tuesday, May 16, 2017

Maximum request length exceeded

ASP.NET by default has a limit of 4 MB of file upload. In order to bump up this limit, web.config needs to be updated. Below is example to allow 1 GB of file upload (1 GB = 1048576 KB = 1073741824 Bytes).
<configuration>
 <system.web>
  <httpRuntime maxRequestLength="1048576" />
 </system.web>
</configuration>
For IIS 7 or later, the following is also needed. Max size value in KB and Bytes must match in both places.
<system.webServer>
 <security>
  <requestFiltering>
   <requestLimits maxAllowedContentLength="1073741824" />
  </requestFiltering>
 </security>
</system.webServer>
In order to specify execution timeout, add executionTimeout value in seconds as follows.
<configuration>
 <system.web>
  <httpRuntime maxRequestLength="1048576" executionTimeout="3600" />
 </system.web>
</configuration>

Thursday, May 4, 2017

Remove time info from getdate()

In SQL Server, a quick efficient way to remove time info from getdate() is

Select [Today] = DateAdd(dd, DateDiff(dd, 0, getdate()), 0)


The result would be something like '2017-05-04 00:00:00.000', which is handy when comparing against date-only column values.

Wednesday, May 3, 2017

SQL Server Transaction - Basic Syntax Example

A quick refresher on proper SQL Server transaction syntax example:

BEGIN TRANSACTION;
BEGIN TRY

    UPDATE dbo.Users set Acitve = 1 Where UserID = 23398

END TRY
BEGIN CATCH

    SELECT 
        ERROR_NUMBER() AS ErrorNumber
       ,ERROR_SEVERITY() AS ErrorSeverity
       ,ERROR_STATE() AS ErrorState
       ,ERROR_PROCEDURE() AS ErrorProcedure
       ,ERROR_LINE() AS ErrorLine
       ,ERROR_MESSAGE() AS ErrorMessage;

    IF @@TRANCOUNT > 0
        ROLLBACK TRANSACTION

END CATCH

IF @@TRANCOUNT > 0
    COMMIT TRANSACTION


Friday, April 14, 2017

Set Site Collection to ReadOnly

Two ways to set a site collection to readonly:


  1. Central Admin --> Application Management --> Site Collections --> Configure Quotas and Locks --> Select Site Collection --> Select ReadOnly
  2. Via PowerShell:
    Set-SPSite -Identity "site_collection_url" -LockState "ReadOnly"
    

LockState options:
  • Unlock to unlock the site collection and make it available to users.
  • NoAdditions to prevent users from adding new content to the site collection. Updates and deletions are still allowed.
  • ReadOnly to prevent users from adding, updating, or deleting content.
  • NoAccess to prevent users from accessing the site collection and its content. Users who attempt to access the site receive an error.

Thursday, April 13, 2017

Quick Javascript Timer

Example of a quick hh:mm:ss timer


<!doctype html>
<html>
<head><title>Timer After 10 seconds</title>
<style>
body{font-family: Arial; line-height: 1.5em; color: #333;}
.timer{font-size: 100px; line-height: 120px;}
</style>
<script type="text/javascript" src="http://ajax.aspnetcdn.com/ajax/jQuery/jquery-1.10.0.min.js"></script>
</head>
<body>
<h1>Hour Min Timer Example</h1>
<p>
<ul>
 <li>Timer should appear after 10 seconds of lapse of user inactivity with mouse and keyboard</li>
 <li>Timer format can be hh:mm:ss or hh:mm.
 <li>Second value that is updated at every second is an intuitive indicator that this is a timer.
</ul>
</p>
<div class="timer">
 <span class="timeOutput" id="timeOutput"></span>
</div>
<script>

// Reset and tick every second
var my = my || {};

my.friendlyTime = function( sec ){

 this.ss = "0" + (sec % 60);
 this.ss = this.ss.substring( this.ss.length-2, this.ss.length );
 this.mm = "0" + Math.floor( sec / 60 ) % 60;
 this.mm = this.mm.substring( this.mm.length-2, this.mm.length );
 this.hh = "0" + Math.floor( sec / 3600 );
 this.hh = this.hh.substring( this.hh.length-2, this.hh.length );
};

my.display_time_since_pageload = function( initial_delay_sec, display_format, display_selector){
 /*
  initial_delay_sec: seconds to wait to display the ellapsed time
  display_format: "hh:mm:ss" or "hh:mm"
  display_selector: location to display the elapsed time. must be jQuery-format selector
 */
 var totalSec = 0;

 setInterval(function(){
 
  totalSec++;
  //console.log( "totalSec = " + totalSec );
  
  if( totalSec >= initial_delay_sec ){

   var t = new my.friendlyTime( totalSec );

   if(display_format == "hh:mm:ss") {
    $(display_selector).html( t.hh + ":" + t.mm + ":" + t.ss );
   }
   if(display_format == "hh:mm") {
    $(display_selector).html( t.hh + ":" + t.mm );
   }
   //console.log( "t.hh = " + t.hh + ", t.mm = " + t.mm + ", t.ss = " + t.ss ); 
  }
  
 }, 1000);
};

$(function(){
 my.display_time_since_pageload( 10, "hh:mm:ss", "#timeOutput" );
});

</script>


</body>
</html>


Wednesday, March 29, 2017

Set [Enter] key as default action to cause associated button to click

In the example below, each textbox has its own default button. While focus is in a text box, pressing [Enter] key will cause the associated button to click so that you do not need to click the associated button separately.


<!doctype html>
<html>
<head><title>Set Enter Key as default Click</title>
<style type="text/css">
 body { font-family: Verdana, Tahoma; line-height: 1.7em; font-size: 0.85em; }
</style>
<script
  src="https://code.jquery.com/jquery-1.12.4.min.js"
  integrity="sha256-ZosEbRLbNQzLpnKIkEdrPv7lOy9C27hHQ+Xp8a4MxAQ="
  crossorigin="anonymous"></script>
</head>
<body>
 <h1>Enter Key Capture</h1>
 <div>
  <input type="text" id="txt1" />
  <input type="button" id="btn1" class="defaultButton" value="Button1" />
 </div>
 <div>
  <input type="text" id="txt2" />
  <input type="button" id="btn2" class="defaultButton" value="Button2" />
 </div>
</body>
<script type="text/javascript">
 $( document ).ready( function() {
  
  $( 'input[type=text]' ).bind({
   keypress: function( event ){
    if( checkIfEnterKeyPressed() ){
     
     var message = "Enter key has been pressed while in " + 
         $(this).attr("id") + ".";
     
     $(this).siblings(".defaultButton").bind(
      "click", 
      { msg: message }, 
      function( event ){
       alert( event.data.msg + "\n" + $(this).val() + " clicked." );
      }
     ).click();
    }
   }
  });
 
  var checkIfEnterKeyPressed = function(){
   var keycode = ( event.keyCode ? event.keyCode : event.which );
   return ( keycode == '13' ? true : false );
  };
 });

</script>
</html>

Good old popup dialog

Good old popup dialog example: parent page collects data from child popup dialog.


parent.html
<!doctype html>
<html><head><title>parent</title>
</head>
<body>
Name: <input type="text" id="txtName" readonly="readonly" />
<input type="button" value="Open Popup" onclick="openPopup()" />
</body>
<script type="text/javascript">
 var openPopup = function(){
  popup = window.open( "popup.html", "Select Name", "width=300,height=100;" );
  popup.focus();
 };
</script>
<html>


popup.html
<select name="ddlNames" id="ddlNames">
 <option value="Ken">Ken</option>
 <option value="Steve">Steve</option>
 <option value="Sam">Sam</option>
 <option value="Kirk">Kirk</option>
</select
<br /><br />
<input type="button" value="Make Selection" onclick="makeSelection()" />
<script type="text/javascript">
 var makeSelection = function(){
  if( window.opener != null && !window.opener.closed ){
   var nameSelected = document.getElementById( "ddlNames" ).value;
   var txtName = window.opener.document.getElementById( "txtName" );
   txtName.value = nameSelected;   
  } 
  window.close();
 };
</script>

Linq Example of Group-By

Group-By Example in Linq.

var groupByResult = 
    from p in db.Person
    join s in db.School
    on p.SchoolID = s.SchoolID
    group new { p, s } by new { p.SchoolID, s.SchoolName }
    into grp
    select new
    {
        Count     = grp.Count(),
        SchoolID  = grp.Key.SchoolID,
        SpaceName = grp.Key.SchoolName
    }

Monday, January 16, 2017

Dismiss Keyboard When Tapping Outside UITextField

A quick way to dismiss keyboard when tapping outside a UITextField can be done as follows.
- (void)viewDidLoad {
    ...
    [self.view addGestureRecognizer:[[UITapGestureRecognizer alloc] 
                                       initWithTarget:self.view 
                                               action:@selector(endEditing:)]];
    ...
}

The same can be re-written with a selector method as follows.
- (void)viewDidLoad {
    ...
    UITapGestureRecognizer *tap = [[UITapGestureRecognizer alloc] 
                                     initWithTarget:self
                                             action:@selector(hideKeyboard)];
    [self.view addGestureRegnizer:tap];
    ...
}

- (void)hideKeyboard {
    [self.view endEditing:YES];
}

Friday, January 13, 2017

Async Request using dataTaskWithRequest

Here is a simple example of Async Request using [NSURLSession dataTaskWithURL].

- (void) asyncDemo1 { NSURL *url = [NSURL URLWithString:@"https://mysite.com/sampleData.json"]; NSURLRequest *request = [NSURLRequest requestWithURL:url]; NSURLSession *session = [NSURLSession sharedSession]; NSURLSessionTask *task = [session dataTaskWithRequest:request completionHandler:^(NSData * _Nullable data, NSURLResponse * _Nullable response, NSError * _Nullable taskError) { dispatch_async(dispatch_get_global_queue(DISPATCH_QUEUE_PRIORITY_DEFAULT, 0), ^(void){ // ----- Place background thread operations here ----- // dispatch_async(dispatch_get_main_queue(), ^(void){ // ----- Place async UI update, etc here ----- // if(taskError){ NSLog(@"taskError is %@", [taskError localizedDescription]); } else{ NSLog(@"%@", [[NSString alloc] initWithData:data encoding:NSUTF8StringEncoding]); } }); }); }]; [task resume]; }

App Transport Security Exception using Info.plist

Here's a short snippet to allow domain exceptions in Info.plist. Method 1 is not recommended, because it will allow all domains. Method 2 is recommended.

Method 1: Not recommended (all domains are accessible) <plist> <dict> . . . <key>NSAppTransportSecurity</key> <dict> <!-- Allows all connections regardless --> <key>NSAllowsArbitraryLoads</key> <true /> </dict> . . . </dict> </plist>
Medhod 2: Recommended (only mysite.com is allowed) <plist> <dict> . . . <key>NSAppTransportSecurity</key> <dict> <key>NSExceptionDomains</key> <dict> <key>mysite.com</key> <dict> <key>NSExceptionAllowsInsecureHTTPLoads</key> <true /> <key>NSIncludesSubdomains</key> <true /> </dict> </dict> </dict> . . . </dict> </plist>

Friday, January 6, 2017

WCF Configuration for Response in JSON Format

Below is a simple example of WCF that returns data in JSON format.

  • When using UriTemplate in WebInvoke attribute, all parameters should be of string type.
  • In the web.config, don't forget to add serviceBehavior and endpointBehavior. 
  • The endpointBehavior needs to have <webHttp /> and not <enableWebScript />.
  • When using WCF for Ajax client (i.e., $.ajax()), keep in mind that Ajax client only knows "GET" and "POST" and not "PUT" or "DELETE".

IService2.cs
[OperationContract]
[WebInvoke(Method ="GET", 
   UriTemplate = "/CategoryName/{id}", 
   ResponseFormat = WebMessageFormat.Json, 
   RequestFormat =WebMessageFormat.Json)]
string GetCategoryName(string id);

Service2.svc.cs
public class Service2 : IService2
  public string GetCategoryName(string id)
  {
     string retVal = "NotFound";
     int categoryID = Convert.ToInt32(id);
     using (NorthwindEntities db = new NorthwindEntities())
     {                
        var category = db.Categories.Find(categoryID);
        if(category != null)
        {
           retVal = category.CategoryName;
        }
     }
     return string.Format("Category with ID {0} is {1}.", categoryID, retVal);
   }
}

web.config

<system .servicemodel="">
    <behaviors>
      <servicebehaviors>
        <behavior name="default">
          <servicemetadata httpgetenabled="true" httpsgetenabled="true">          
          <servicedebug includeexceptiondetailinfaults="false">
        </servicedebug></servicemetadata></behavior>
      </servicebehaviors>
      <endpointbehaviors>
        <behavior name="default">
          <webHttp/>
        </behavior>
      </endpointbehaviors>
    </behaviors>
    <services>
      <service behaviorconfiguration="default" name="NorthwindWCF.Service2">
        <host>
          <baseaddresses>
            <add baseaddress="http://localhost:4957">
          </add></baseaddresses>
        </host>
        <endpoint behaviorconfiguration="default" binding="webHttpBinding" contract="NorthwindWCF.IService2">
        </endpoint>
      </service>
    </services>
    <protocolmapping>
      <add binding="basicHttpsBinding" scheme="https">
    </add></protocolmapping>
    <servicehostingenvironment aspnetcompatibilityenabled="true" multiplesitebindingsenabled="true">
  </servicehostingenvironment></system>

Thursday, January 5, 2017

Use MasterPage, JavaScript, Custom Security Level to Protect Provider-Hosted App's SharePoint Site

When setting up a SharePoint Provider-Hosted app (or add-in), I experienced a dilemma as to
  1.  Allow non-admin users ReadWrite permission to all necessary Lists and Document Libraries for the Provider-Hosted app (app uses current user's credential when accessing Lists and Libraries).
  2. Block non-admin users from directly accessing the SharePoint subweb (site) that hosts the Provider-Hosted app and its related Lists and Libraries .
A technically savvy person can easily decode the long URL of RemoteWeb of the Provider-Hosted app. They can trace it back to the data-repository SharePoint site's URL.

The difficulty for SharePoint admin is to accomplish how to allow ReadWrite permission to users on Lists and Libraries and to block users from directly accessing the same Lists and Libraries. If we remove read/write permission on the list from the user, the Provider-Hosted app cannot do its IO, because the app uses the user's credential to perform read/write.

So I came up with two lines of defense.  to accomplish both "allow" and "restrict".

First, I created a new permission level at the site collection based on Contribute permission level.
After creating a copy of Contribute permission level, I named it Custom Contribute. Then I further removed the following granular permission attributes.  
  • Browse Directories  (to prevent users from UNC-path backdoor access through Windows Explorer)
  • Manage Personal Views 
  • Add/Remove Personal Web Parts  
  • Update Personal Web Parts 
Deselecting last three options would prevent users from creating their own views. By taking away this ability, users can only use the the default view customized by SharePoint admins.

When the Custom Contribute permission level was ready, I created a SharePoint group called Custom Contribute Members that uses the Custom Contribute permission level. Then I added two domain groups to Custom Contribute Members in order to make the Provider-Hosted app to work properly (The provider-hosted app needed to be available to all domain users in this case).
  • Domain Users
  • Authenticated Users
Without Authenticated Users in the Custom Contribute Members group, SharePoint workflow email notification did not work properly. 

The Provider-Hosted App and its related Lists and Libraries were all placed in one subweb under the same site collection. I only kept the Custom Contribute Members group among the subweb's member groups.  I added all admin users to the Site Collection Administrators for full control.

The first line of defense was to restrict end-users' privileges as much as possible. Obviously, at this point, a technically savvy user with ill-intention can trace back the subweb's URL, access the subweb and browse or tamper with Lists and Libraries.  

Now the second line of defense.....

At the moment, I trimmed down all domain users' permission as much as possible by using Custom Contribute Members as mentioned above. All domain users can run the Provider-Hosted app to open the RemoteWeb and perform their own read/write actions with no problem.

Now it's time to block all non-admin users from directly accessing the data-repository subweb by web browser.

One of the easiest ways to allow only the admin users to directly access the data-repository subweb via web browser is:
  • Custom MasterPage
  • New Custom List that holds admin users' names
  • jQuery and custom javascript to query admin users' names and redirect
By using a custom MasterPage, I was able to apply a custom JavaScript run executes at any page load of the entire data-repository via a web browser. The JavaScript queries a custom list called Administrators that contains admin users' names. If the current user is not found in the Administrators List, the user will be redirected to some other page immediately. If current user is found, then the script does nothing, allowing the user to have direct normal access to the SharePoint site via a web browser.

**Before trying to use a Custom MasterPage, don't forget to turn on Publishing Infrastructure at the site collection settings and Publishing at the site settings.

At the site collection level, I added the jQuery file and a blank custom javascript file in SiteAssets library as follows.

/SiteAssets/libs/js/jquery-1.12.4.min.js
/SiteAssets/libs/js/RedirectNonAdmin.js
          
Then I used SharePoint Designer to open the site collection, created a copy of seattle.html MasterPage and named it ProviderHosted.html. I then checked it out and check it back with a major version.  

I edited the ProfiderHosted.html master page file by adding two <ScriptLink...> tags in the <head> section as follows.


I saved the new MasterPage file and made sure that it is beyond version 1.0 and confirmed that the new MasterPage ProviderHosted is available in the dropdown under MasterPage in the subweb's site settings.

Then I created a new custom List in the same SharePoint site that hosts the app. I named the new custom List "Administrators". It only needed one field: Title. 

Then I added names of admin users under Title field of the new Administrators list. Later on, RedirectNonAdmin.js will retrieve admin users' names from this list's Title field and compare them against current user name. If there is no match, the script redirects the user to Google.


Below is RedirectNonAdmin.js.

var my = my || {}; 

//
// Note that there are two $.ajax functions, 
// one nested inside another's done() function. 
// This was necessary as list of admin users were retrieved 
// asynchrounously first, and then compared against current user name, 
// which had to be retrieved from SharePoint api asynchronously, too.
//
my.redirectIfNotMemberOf = function( listName ){
 
 var adminListUrl = _spPageContextInfo.webAbsoluteUrl + 
    "/_api/web/lists/getbytitle('" + listName + "')/items";
 
 $.ajax({
  url: adminListUrl,
  method: "GET",
  headers: { "Accept": "application/json; odata=verbose" },
 }).done(function(data){
  // 
  // Get Administrators names from Administrators List.
  //
  var listItems = data.d.results;
  var admins = new Array();
  $.each(listItems, function(i){
   admins.push(listItems[i].Title);
  });
  console.log(admins);
  //
  // Get current user's name. 
  //
  var currentUserID = _spPageContextInfo.userId;
  var currentUserUrl = _spPageContextInfo.webAbsoluteUrl + 
     "/_api/web/getuserbyid(" + currentUserID + ")";

  $.ajax({
   url: currentUserUrl,
   method: "GET",
   headers: { "accept": "application/json;odata=verbose" }, 
  }).done(function(data){
   console.log(data.d.Title);
   var currentUserName = data.d.Title;
   //
   // Redirect to access denied page if current user name is not found 
   // in admin users' names.
   //
   var isMember = 0;
   $.each(admins, function(i){
    if(admins[i].toUpperCase() == currentUserName.toUpperCase()){     
     isMember = 1;
     return false; // get out of $.each()
    }
   });
   
   if( isMember == 0 ){
    // If not a member, redirect to some other page.
    location.href="http://www.google.com";
   }
  }).fail(function(data){   
   console.log("Error at my.getCurrentUserName()\n" + data); 
  });  
  
 }).fail(function(data){
  console.log("Error at my.getListTitleValue()\n" + data); 
 });
};


$(function(){

 // Current web must contain a list named "Administrators" 
 // with admin users in the Title field.
 // In order to stop the redirect behavior, 
 // either change the master page 
 // or change the name of this script by Windows Explorer via UNC path.
 my.redirectIfNotMemberOf( "Administrators" );
 
});


Before using RedirectNonAdmin.js, make sure that you add yourself to the custom list  Admninistrators. Otherwise, you could get kicked out of the subweb as soon as you change the MasterPage of the subweb. The Administrators list must reside on the same subweb where the Provider-Hosted app and its related lists and libraries are hosted in order for the RedirectNonAdmin.js to work properly.

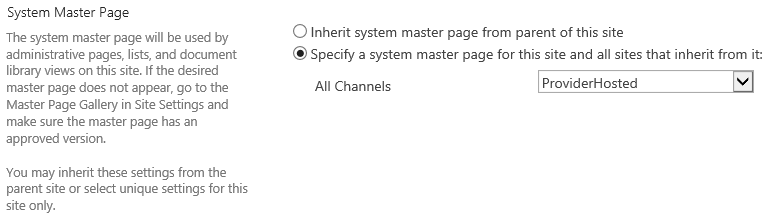
After RedirectNonAdmin.js file is filled in and ready, go to subweb's site settings --> Master page and change System Master Page to the new  ProviderHosted master page from the dropdown.


Now when non-admin users visit the subweb directly, they will be redirected to Google. Only users specified in the Administrators list can directly access the subweb.

If you mistakenly did not include yourself in the Administrators list and cannot access the SharePoint site, the easiest fix would be to use SharePoint Designer, open the SiteCollection-level site, open ProviderHosted.html master page, and comment out the <ScriptLink...> tag that includes the RedirectNonAdmin.js.