Showing posts with label SharePoint. Show all posts

Friday, April 14, 2017

Set Site Collection to ReadOnly

Two ways to set a site collection to readonly:


  1. Central Admin --> Application Management --> Site Collections --> Configure Quotas and Locks --> Select Site Collection --> Select ReadOnly
  2. Via PowerShell:
    Set-SPSite -Identity "site_collection_url" -LockState "ReadOnly"
    

LockState options:
  • Unlock to unlock the site collection and make it available to users.
  • NoAdditions to prevent users from adding new content to the site collection. Updates and deletions are still allowed.
  • ReadOnly to prevent users from adding, updating, or deleting content.
  • NoAccess to prevent users from accessing the site collection and its content. Users who attempt to access the site receive an error.

Thursday, January 5, 2017

Use MasterPage, JavaScript, Custom Security Level to Protect Provider-Hosted App's SharePoint Site

When setting up a SharePoint Provider-Hosted app (or add-in), I experienced a dilemma as to
  1.  Allow non-admin users ReadWrite permission to all necessary Lists and Document Libraries for the Provider-Hosted app (app uses current user's credential when accessing Lists and Libraries).
  2. Block non-admin users from directly accessing the SharePoint subweb (site) that hosts the Provider-Hosted app and its related Lists and Libraries .
A technically savvy person can easily decode the long URL of RemoteWeb of the Provider-Hosted app. They can trace it back to the data-repository SharePoint site's URL.

The difficulty for SharePoint admin is to accomplish how to allow ReadWrite permission to users on Lists and Libraries and to block users from directly accessing the same Lists and Libraries. If we remove read/write permission on the list from the user, the Provider-Hosted app cannot do its IO, because the app uses the user's credential to perform read/write.

So I came up with two lines of defense.  to accomplish both "allow" and "restrict".

First, I created a new permission level at the site collection based on Contribute permission level.
After creating a copy of Contribute permission level, I named it Custom Contribute. Then I further removed the following granular permission attributes.  
  • Browse Directories  (to prevent users from UNC-path backdoor access through Windows Explorer)
  • Manage Personal Views 
  • Add/Remove Personal Web Parts  
  • Update Personal Web Parts 
Deselecting last three options would prevent users from creating their own views. By taking away this ability, users can only use the the default view customized by SharePoint admins.

When the Custom Contribute permission level was ready, I created a SharePoint group called Custom Contribute Members that uses the Custom Contribute permission level. Then I added two domain groups to Custom Contribute Members in order to make the Provider-Hosted app to work properly (The provider-hosted app needed to be available to all domain users in this case).
  • Domain Users
  • Authenticated Users
Without Authenticated Users in the Custom Contribute Members group, SharePoint workflow email notification did not work properly. 

The Provider-Hosted App and its related Lists and Libraries were all placed in one subweb under the same site collection. I only kept the Custom Contribute Members group among the subweb's member groups.  I added all admin users to the Site Collection Administrators for full control.

The first line of defense was to restrict end-users' privileges as much as possible. Obviously, at this point, a technically savvy user with ill-intention can trace back the subweb's URL, access the subweb and browse or tamper with Lists and Libraries.  

Now the second line of defense.....

At the moment, I trimmed down all domain users' permission as much as possible by using Custom Contribute Members as mentioned above. All domain users can run the Provider-Hosted app to open the RemoteWeb and perform their own read/write actions with no problem.

Now it's time to block all non-admin users from directly accessing the data-repository subweb by web browser.

One of the easiest ways to allow only the admin users to directly access the data-repository subweb via web browser is:
  • Custom MasterPage
  • New Custom List that holds admin users' names
  • jQuery and custom javascript to query admin users' names and redirect
By using a custom MasterPage, I was able to apply a custom JavaScript run executes at any page load of the entire data-repository via a web browser. The JavaScript queries a custom list called Administrators that contains admin users' names. If the current user is not found in the Administrators List, the user will be redirected to some other page immediately. If current user is found, then the script does nothing, allowing the user to have direct normal access to the SharePoint site via a web browser.

**Before trying to use a Custom MasterPage, don't forget to turn on Publishing Infrastructure at the site collection settings and Publishing at the site settings.

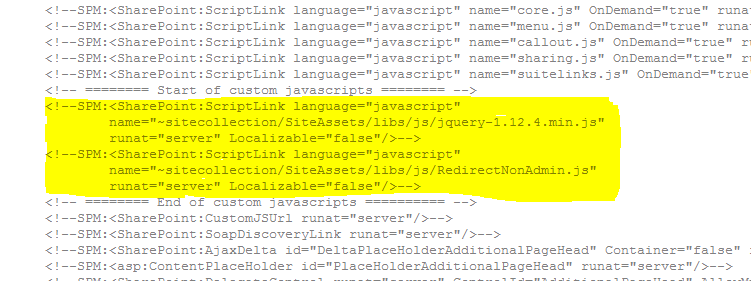
At the site collection level, I added the jQuery file and a blank custom javascript file in SiteAssets library as follows.

/SiteAssets/libs/js/jquery-1.12.4.min.js
/SiteAssets/libs/js/RedirectNonAdmin.js
          
Then I used SharePoint Designer to open the site collection, created a copy of seattle.html MasterPage and named it ProviderHosted.html. I then checked it out and check it back with a major version.  

I edited the ProfiderHosted.html master page file by adding two <ScriptLink...> tags in the <head> section as follows.


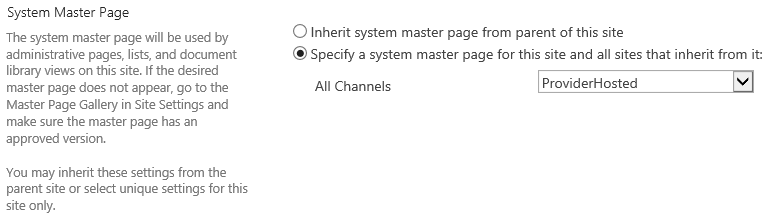
I saved the new MasterPage file and made sure that it is beyond version 1.0 and confirmed that the new MasterPage ProviderHosted is available in the dropdown under MasterPage in the subweb's site settings.

Then I created a new custom List in the same SharePoint site that hosts the app. I named the new custom List "Administrators". It only needed one field: Title. 

Then I added names of admin users under Title field of the new Administrators list. Later on, RedirectNonAdmin.js will retrieve admin users' names from this list's Title field and compare them against current user name. If there is no match, the script redirects the user to Google.


Below is RedirectNonAdmin.js.

var my = my || {}; 

//
// Note that there are two $.ajax functions, 
// one nested inside another's done() function. 
// This was necessary as list of admin users were retrieved 
// asynchrounously first, and then compared against current user name, 
// which had to be retrieved from SharePoint api asynchronously, too.
//
my.redirectIfNotMemberOf = function( listName ){
 
 var adminListUrl = _spPageContextInfo.webAbsoluteUrl + 
    "/_api/web/lists/getbytitle('" + listName + "')/items";
 
 $.ajax({
  url: adminListUrl,
  method: "GET",
  headers: { "Accept": "application/json; odata=verbose" },
 }).done(function(data){
  // 
  // Get Administrators names from Administrators List.
  //
  var listItems = data.d.results;
  var admins = new Array();
  $.each(listItems, function(i){
   admins.push(listItems[i].Title);
  });
  console.log(admins);
  //
  // Get current user's name. 
  //
  var currentUserID = _spPageContextInfo.userId;
  var currentUserUrl = _spPageContextInfo.webAbsoluteUrl + 
     "/_api/web/getuserbyid(" + currentUserID + ")";

  $.ajax({
   url: currentUserUrl,
   method: "GET",
   headers: { "accept": "application/json;odata=verbose" }, 
  }).done(function(data){
   console.log(data.d.Title);
   var currentUserName = data.d.Title;
   //
   // Redirect to access denied page if current user name is not found 
   // in admin users' names.
   //
   var isMember = 0;
   $.each(admins, function(i){
    if(admins[i].toUpperCase() == currentUserName.toUpperCase()){     
     isMember = 1;
     return false; // get out of $.each()
    }
   });
   
   if( isMember == 0 ){
    // If not a member, redirect to some other page.
    location.href="http://www.google.com";
   }
  }).fail(function(data){   
   console.log("Error at my.getCurrentUserName()\n" + data); 
  });  
  
 }).fail(function(data){
  console.log("Error at my.getListTitleValue()\n" + data); 
 });
};


$(function(){

 // Current web must contain a list named "Administrators" 
 // with admin users in the Title field.
 // In order to stop the redirect behavior, 
 // either change the master page 
 // or change the name of this script by Windows Explorer via UNC path.
 my.redirectIfNotMemberOf( "Administrators" );
 
});


Before using RedirectNonAdmin.js, make sure that you add yourself to the custom list  Admninistrators. Otherwise, you could get kicked out of the subweb as soon as you change the MasterPage of the subweb. The Administrators list must reside on the same subweb where the Provider-Hosted app and its related lists and libraries are hosted in order for the RedirectNonAdmin.js to work properly.

After RedirectNonAdmin.js file is filled in and ready, go to subweb's site settings --> Master page and change System Master Page to the new  ProviderHosted master page from the dropdown.


Now when non-admin users visit the subweb directly, they will be redirected to Google. Only users specified in the Administrators list can directly access the subweb.

If you mistakenly did not include yourself in the Administrators list and cannot access the SharePoint site, the easiest fix would be to use SharePoint Designer, open the SiteCollection-level site, open ProviderHosted.html master page, and comment out the <ScriptLink...> tag that includes the RedirectNonAdmin.js.

Saturday, November 12, 2016

SharePoint Workflow Manager - Useful Info

Here are some useful links and reminders when setting up or troubleshooting the SharePoint Workflow Manager 1.0.

Suppose the SharePoint environment is made of the following:
Domain Name: contoso.edu
SharePoint Server FQDN: sp.contoso.edu (admin site port = 13311)
SharePoint Server Computer Name: SP13
Workflow Manager FQDN: sqlwopi.contoso.edu

  • Check if Workflow Manager is connected:
    http://sp.contoso.edu:13311/_admin/WorkflowServiceStatus.aspx 
  • Check if Workflow Service is working (Do this from the Sharepoint Server):
    http://sqlwopi.contoso.edu:12291 (if http is used)
    https://sqlwopi.contoso.edu:12290 
  • To check the Workflow Manager Service status (Do this on the Workflow Manager Service Server):
    Get-WFFarmStatus
  • To connect SharePoint Farm to Workflow Manager Service (on SharePoint Server):
    Register-SPWorkflowService -SPSite "https://sp.contoso.edu" -WorkflowHostUri "http://sqlwopi.contoso.edu:12291" -AllowOAuthHttp -Force (when http is used)

Tuesday, July 26, 2016

Provider-Hosted Add-in CRUD example using CSOM

Below is a complete CRUD example of provider-hosted SharePoint Add-In using CSOM. In the controller, the CRUD is performed on a SharePoint list, "Products", which is made of [ID], [Title], [UnitPrice] and [UnitsOnStock] fields.
using System;
using System.Collections.Generic;
using System.Linq;
using System.Web;
using System.Web.Mvc;
using Microsoft.SharePoint.Client;
using ProviderHostedCloud1Web.Models;

namespace ProviderHostedCloud1Web.Controllers
{
    [SharePointContextFilter]
    public class ProductController : Controller
    {

        // GET: Product
        public ActionResult Index()
        {
            var spContext = SharePointContextProvider.Current.GetSharePointContext(HttpContext);
            using (ClientContext cc = spContext.CreateUserClientContextForSPHost())
            {
                if (cc != null)
                {
                    List productList = cc.Web.Lists.GetByTitle("Products");
                    cc.Load(productList);
                    cc.ExecuteQuery();

                    if (productList != null)
                    {
                        CamlQuery query = CamlQuery.CreateAllItemsQuery();
                        ListItemCollection products = productList.GetItems(query);
                        cc.Load(products);
                        cc.ExecuteQuery();

                        List retVal = new List();
                        foreach (var product in products)
                        {
                            retVal.Add(new Product
                            {
                                ID = product.Id,
                                Title = product["Title"].ToString(),
                                UnitPrice = Convert.ToDecimal(product["UnitPrice"]),
                                UnitsOnStock = Convert.ToInt32(product["UnitsOnStock"])
                            });
                        }
                        return View(retVal);
                    }

                    return View();
                }
                else
                {
                    ViewBag.ErrorMessage = "Error: ClientContext is null.";
                    return View();
                }
            }

        }

        // GET: Product/Details/5
        public ActionResult Details(int id)
        {
            try
            {
                var spContext = SharePointContextProvider.Current.GetSharePointContext(HttpContext);
                using (ClientContext cc = spContext.CreateUserClientContextForSPHost())
                {
                    if (cc != null)
                    {
                        ListItem item = cc.Web.Lists.GetByTitle("Products").GetItemById(id);
                        cc.Load(item);
                        cc.ExecuteQuery();

                        if (item != null)
                        {
                            Product retVal = new Product
                            {
                                ID = item.Id,
                                Title = item["Title"].ToString(),
                                UnitPrice = item["UnitPrice"] == null ? 0.00m : Convert.ToDecimal(item["UnitPrice"]),
                                UnitsOnStock = item["UnitsOnStock"] == null ? 0 : Convert.ToInt32(item["UnitsOnStock"])
                            };

                            return View(retVal);
                        }
                        else
                        {
                            return View();
                        }
                    }
                    else
                    {
                        ViewBag.ErrorMessage = "Error: ClientContext was null. ";
                        return View();
                    }
                }
            }
            catch (Exception ex)
            {
                Exception ie = ex;
                while (ie.InnerException != null)
                {
                    ie = ie.InnerException;
                }
                ViewBag.ErrorMessage = "Error: " + ie.Message;
                return View();
            }
        }

        // GET: Product/Create
        public ActionResult Create()
        {
            return View();
        }

        // POST: Product/Create
        [HttpPost]
        public ActionResult Create(System.Web.Mvc.FormCollection collection)
        {
            string title = collection["Title"].ToString();
            decimal unitPrice = collection["UnitPrice"] == null ? 0.00m : Convert.ToDecimal(collection["UnitPrice"]);
            int unitsOnStock = collection["UnitsOnStock"] == null ? 0 : Convert.ToInt32(collection["UnitsOnStock"]);

            try
            {
                var spContext = SharePointContextProvider.Current.GetSharePointContext(HttpContext);
                using (ClientContext cc = spContext.CreateUserClientContextForSPHost())
                {
                    List productList = cc.Web.Lists.GetByTitle("Products");
                    ListItemCreationInformation creationInfo = new ListItemCreationInformation();
                    ListItem item = productList.AddItem(creationInfo);
                    item["Title"] = title;
                    item["UnitPrice"] = unitPrice;
                    item["UnitsOnStock"] = unitsOnStock;
                    item.Update();
                    cc.ExecuteQuery();

                    return RedirectToAction("Index", new { SPHostUrl = Request.QueryString["SPHostUrl"] });
                }
            }
            catch (Exception ex)
            {
                Exception ie = ex;
                while (ie.InnerException != null)
                {
                    ie = ie.InnerException;
                }
                ViewBag.ErrorMessage = "Error: " + ie.Message;
                Product product = new Product { Title = title, UnitPrice = unitPrice, UnitsOnStock = unitsOnStock };
                return View(product);
            }
        }

        // GET: Product/Edit/5
        public ActionResult Edit(int id)
        {
            var spContext = SharePointContextProvider.Current.GetSharePointContext(HttpContext);
            using (ClientContext cc = spContext.CreateUserClientContextForSPHost())
            {
                if (cc != null)
                {
                    ListItem item = cc.Web.Lists.GetByTitle("Products").GetItemById(id);
                    cc.Load(item);
                    cc.ExecuteQuery();
                    if (item != null)
                    {
                        Product product = new Product
                        {
                            ID = item.Id,
                            Title = item["Title"].ToString(),
                            UnitPrice = item["UnitPrice"] == null ? 0.00m : Convert.ToDecimal(item["UnitPrice"]),
                            UnitsOnStock = item["UnitsOnStock"] == null ? 0 : Convert.ToInt32(item["UnitsOnStock"])
                        };
                        return View(product);
                    }
                    else
                    {
                        return View();
                    }
                }
                else
                {
                    ViewBag.ErrorMessage = "Error: ClientContext was null";
                    return View();
                }

            }
        }

        // POST: Product/Edit/5
        [HttpPost]
        public ActionResult Edit(int id, System.Web.Mvc.FormCollection collection)
        {
            try
            {
                string title = collection["Title"].ToString();
                decimal unitPrice = Convert.ToDecimal(collection["UnitPrice"]);
                int unitsOnStock = Convert.ToInt32(collection["UnitsOnStock"]);

                var spContext = SharePointAcsContextProvider.Current.GetSharePointContext(HttpContext);
                using (ClientContext cc = spContext.CreateUserClientContextForSPHost())
                {
                    if (cc != null)
                    {
                        ListItem item = cc.Web.Lists.GetByTitle("Products").GetItemById(id);
                        item["Title"] = title;
                        item["UnitPrice"] = unitPrice;
                        item["UnitsOnStock"] = unitsOnStock;
                        item.Update();
                        cc.ExecuteQuery();
                        return RedirectToAction("Index", new { SPHostUrl = Request.QueryString["SPHostUrl"] });
                    }
                    else
                    {
                        ViewBag.ErrorMessage = "ClientContext was null.";
                        Product product = new Product
                        {
                            ID = id,
                            Title = title,
                            UnitPrice = unitPrice,
                            UnitsOnStock = unitsOnStock
                        };
                        return View(product);
                    }
                }
            }
            catch (Exception ex)
            {
                Exception ie = ex;
                while (ie.InnerException != null)
                {
                    ie = ie.InnerException;
                }
                ViewBag.Error = "Error: " + ie.Message;
                return View();
            }
        }

        // GET: Product/Delete/5
        public ActionResult Delete(int id)
        {
            var spContext = SharePointContextProvider.Current.GetSharePointContext(HttpContext);
            using (ClientContext cc = spContext.CreateUserClientContextForSPHost())
            {
                if (cc != null)
                {
                    ListItem item = cc.Web.Lists.GetByTitle("Products").GetItemById(id);
                    cc.Load(item);
                    cc.ExecuteQuery();

                    if (item != null)
                    {
                        Product product = new Product
                        {
                            ID = item.Id,
                            Title = item["Title"].ToString(),
                            UnitPrice = item["UnitPrice"] == null ? 0.00m : Convert.ToDecimal(item["UnitPrice"]),
                            UnitsOnStock = item["UnitsOnStock"] == null ? 0 : Convert.ToInt32(item["UnitsOnStock"])
                        };
                        return View(product);
                    }
                    else
                    {
                        return View();
                    }
                }
                else
                {
                    ViewBag.Error = "Error: ClientContext was null";
                    return View();
                }
            }

        }

        // POST: Product/Delete/5
        [HttpPost]
        public ActionResult Delete(int id, System.Web.Mvc.FormCollection collection)
        {
            string title = collection["Title"].ToString();
            decimal unitPrice = Convert.ToDecimal(collection["UnitPrice"]);
            int unitsOnStock = Convert.ToInt32(collection["UnitsOnStock"]);
            try
            {
                var spContext = SharePointContextProvider.Current.GetSharePointContext(HttpContext);
                using (ClientContext cc = spContext.CreateUserClientContextForSPHost())
                {
                    if (cc != null)
                    {
                        ListItem item = cc.Web.Lists.GetByTitle("Products").GetItemById(id);
                        item.DeleteObject();
                        cc.ExecuteQuery();
                        return RedirectToAction("Index", new { SPHostUrl = Request.QueryString["SPHostUrl"] });
                    }
                    else
                    {
                        Product product = new Product
                        {
                            ID = id,
                            Title = title,
                            UnitPrice = unitPrice,
                            UnitsOnStock = unitsOnStock
                        };
                        ViewBag.Error = "Error: ClientContext was null";
                        return View();
                    }
                }
            }
            catch (Exception ex)
            {
                Exception ie = ex;
                while (ie.InnerException != null)
                {
                    ie = ie.InnerException;
                }
                ViewBag.ErrorMessage = "Error: " + ie.Message;
                return View();
            }
        }
    }
}

Wednesday, June 29, 2016

SharePoint - unlock a file that is exclusively locked by another user

It appears that both SharePoint 2010 and 2013 still have the bug to potentially lock a file even away from the very person who last checked out the file.

This buggy behavior is described in this Microsoft article.

Basically, when a document in SharePoint is opened by a client program like Word, Excel, SharePoint places a lock on the document on the server. The write lock times out after 10 minutes. Users cannot modify the document during the time when the document is locked.

In a scenario where the program (Word, Excel, etc) that opens the document unexpectedly quits or crashes and you try to open the document again before the write lock times out (10 minutes), you may receive the message that says the document is (exclusively) locked by another user. Even if you are the last person who opened the document, you may receive this message, too.

Now the problem may continue even if you wait for 10 minutes. When the document is coninued to be in locked status, we can use Powershell script to remove the lock as described here.

## To find out about locked info of the file
$web = Get-SPWeb "https://sharepoint.mycompany.com/sites/mysite"
$list = $web.Lists["Shared Documents"]
$item = $list.GetItemById(3)
$file = $item.File
$file

The LockType property from script above may show "None", yet the file may still be locked away from the last person who opened it. Now use Powershell to clear the lock.
$fileTime = New-Object System.TimeSpan(10000)
## Create a new file lock on the file
$file.Lock([Microsoft.SharePoint.SPFile+SPLockType]::Exclusive, "Test Lock", $fileTime)
## Remove the lock from the file
$file.UndoCheckOut()

If the script is actually locked by another user and the lock is not being released for any reason, you can use the following script to remove the lock via impersontion, too.
$web = Get-SPWeb "https://sharepoint.mycompany.com/sites/mysite"
$list = $web.Lists["Shared Documents"]
$item = $list.GetItemById(3)
$file = $item.File
$userID = $file.LockedByUser.ID
$user = $web.AllUsers.GetByID($userID)

$impersonatedSite = New-Object Microsoft.SharePoint.SPSite($web.Url, $user.UserToken)
$impersonatedWeb = $impersonatedSite.OpenWeb();
$impersonatedList = $impersonatedWeb.Lists[$list.Title]
$impersonatedItem = $impersonatedList.GetItemById($item.ID)
$impersonatedFile = $impersonatedItem.File
$impersonatedFile.ReleaseLock($impersonatedFile.LockId)

Tuesday, June 14, 2016

Change Title (linked to item with edit menu) to a different column in SharePoint List

By default, the automatically created Title column of custom SharePoint List functions as the link to item detail view and carries the ellipse button (item edit menu).

In order to hide Title column and associate the "link to item with edit menu" to another column:

  1. Go to List Settings --> Advanced Settings --> "Yes" on Allow management of content types. On the List Settings, go to Content Types --> Item --> Hide "Title" column. Afterwards, "Title" column will not appear in Create, Edit and Details forms.
  2. Go to the View(s) correcponding to List View and hide "Title" column.
  3. Use SharePoint 2013 Designer, open AllItems.aspx page or corresponding list page, look for <ViewFields> tag. Add linkToItem="TRUE" linkToItemAllowed="TRUE" listItemMenu="TRUE" to the column that should function as link to details view and carry the ellipse button (item edit menu). Highlighted column below is an example. Beware that these attributes and their values are case-sensitive!
<View Name="{EDF62A70-F0D9-4B36-B3C4-F35017C57868}" 
    DefaultView="TRUE" 
    MobileView="TRUE" 
    MobileDefaultView="TRUE" 
    Type="HTML" 
    DisplayName="All Items" 
    Url="/developer/Ken/Demo1/Lists/Classroom/AllItems.aspx" Level="1" 
    BaseViewID="1" 
    ContentTypeID="0x" 
    ImageUrl="/_layouts/15/images/generic.png?rev=23" >
    <Query><OrderBy><FieldRef Name="ID"/></OrderBy></Query>
    <ViewFields>
        <FieldRef Name="Title"  linkToItem="TRUE" linkToItemAllowed="TRUE" listItemMenu="TRUE" />
        <FieldRef Name="Subject"/>
        <FieldRef Name="Teacher"/>
    </ViewFields>
    <RowLimit Paged="TRUE">30</RowLimit>
    <JSLink>clienttemplates.js</JSLink>
    <XslLink Default="TRUE">main.xsl</XslLink>
    <Toolbar Type="Standard"/>
</View>

Monday, May 23, 2016

Copy SharePoint List Items To Another Identical List

The following Powershell script could be useful while importing data into existing list. If such need arises, one can import data from spreadsheet into a new list and then copy its list items to the destination list.

Keep in mind though: ReadOnly fields, such as [CreatedDateTime] or [LastUpdatedDateTime] field, cannot be manipulated through the script below.
try
{
    $web = Get-SPWeb "http://site"

    $sList = $web.Lists["Movies2"]  #source-list
    $dList = $web.Lists["Movies"]   #destination-list

    Write-Host "Working on Web: "$web.Title -ForegroundColor Green

    if($sList)
    {
        Write-Host "    Working on List: " sList.Name -ForegroundColor Cyan

        $spSourceItems = $sList.Items
        $sourceSPFieldCollection = $sList.Fields

        
        foreach($item in $spSourceItems)
        {
            if($dList)
            {
                $newSPListItem = $dList.AddItem()

                #Copy all field data except Attachments
                foreach($spField in $sourceSPFieldCollection)
                {
                    if($spField.ReadOnlyField -ne $True -and $spField.InternalName -ne "Attachments")                   
                    {
                        $newSPListItem[$($spField.InternalName)] = $item[$($spField.InternalName)]
                    }
                }

                #Copy Attachments
                foreach($leafName in $item.Attachments)
                {
                    $spFile = $sList.ParentWeb.GetFile($($item.Attachments.UrlPrefix + $leafName))
                    $newSPListItem.Attachments.Add($leafName, $spFile.OpenBinary())
                }

                #Update new LisItem
                $newSPListItem.Update()
            }
            Write-Host "        Copying $($item["Name"]) completed"
        }
       
    }
    
}
catch
{
    Write-Host "Error: " $_.Exception.ToString() -ForegroundColor Red
}

Wednesday, July 8, 2009

Use PSCONFIG to set SharePoint's Config and AdminContent database names

Just came across Kit Kai's Tech blog where he talks about how to specify the name of the central admin content database before running the SharePoint Config Wizard. It is an excellent idea to set the names of AdminContent and Config databases as desired instead of changing the db names manually after having the Config Wizard automatically create the databases (my previous article talks about how to change the existing Config and AdminContent's database names).

In short, Kit Kai's article says the following.

Assuming the following,
{
Database Server Name = "myDatabaseServer"
AdminContent DB Name = "SP_AdminContent"
Config DB Name = "SP_Config"
Service Account = "myDomain\svcAccount"
}
1. Install SharePoint on the server. Do not run the Config Wizard just yet.

2. Go to the path "C:\Program Files\Common Files\Microsoft Shared\Web Server Extensions\12\bin".

3. Run psconfig.exe -cmd configdb -create -server "myDatabaseServer"
-database "SP_Config" -user "myDomain\svcAccount" -password ""
-admincontentdatabase "SP_AdminContent"
(if you encounter an error at this point, I suggest that you assign local admin rights to the service account and use "runas" to run the psconfig under the service account's credential)

4. Make sure the collation of the newly created databases is "Latin1_General_CI_AS_KS_WS".

5. Run SharePoint Config Wizard. Choose "Do not disconnect from the server farm".


Thank you Kit Kai!

How to change database names for SharePoint's Config and Admin Content databases

I revisited and documented in simple format one of the very tedious yet useful techniqes in SharePoint administration. These tips took me some time and many frustrating moments of trial-and-error's. Hopefully, those who are just entering the world of SharePoint administration find these tips useful and can save some time.

To change SharePoint_AdminContent database name
{   assuming the following ...
  • Central admin site = "http://mysharepoint:13311/"
  • Service account = "myDomain\John Doe" - (allow dbcreator role temporarily while performing this name change task)
  • Databse server name = "myDatabaseServer"
  • New admin content database name = "SharePoint_AdminContent"
}
  1. Backup current admin content database and restore it to a new database with the desirable name (i.e. SharePoint_AdminContent)
  2. In central admin site, remove the content database of the Central Admin site. After this, the Central Admin site becomes non- functional.
  3. On the web server that runs SharePoint Central Admin site, give local admin rights to the impersonator account("myDomain\John Doe") that connects to the database server for SharePoint.
  4. On the web server that runs SharePoint Central Admin site, open the command console and run the following command, [runas /u:"myDomain\John Doe" cmd.exe]. Enter password of "myDomain\John Doe" when prompted. A new console window will open up. 
  5. This will allow "myDomain\John Doe" to perform the following tasks as service account and relieve you of lots of permission-related conflict.
  6. On the new console window (running under "myDomain\John Doe"), go to the following path "C:\Progra~1\common files\Microsoft Shared\Web Server Extensions\12\bin\".
  7. Run "stsadm -o addcontentdb -url "http://mysharepoint:13311/" - databasename "SharePoint_AdminContent" -databaseserver "myDatabaseServer"

To change SharePoint_Config database name
{  assuming the following ...
  1. Central admin site = "http://mysharepoint:13311/"
  2. Service account = "myDomain\John Doe" - (allow dbcreator role temporarily for this example)
  3. Databse server name = "myDatabaseServer"
  4. New config database name = "SharePoint_Config"
}

::Method A
  1. Backup current config database. Create a new database with the desired name (i.e., SharePoint_Config) and restore from the database backup of the original config database.
  2. On the web server that runs SharePoint Central Admin site, give local admin rights to the impersonator account("myDomain\John Doe") that connects to the database server for SharePoint.
  3. On the web server that runs SharePoint Central Admin site, open the command console and run the following command, [ runas /u:"myDomain\John Doe" cmd.exe ]. Enter password of "myDomain\John Doe" when prompted. A new console window will open up. 
  4. This will allow "myDomain\John Doe" to perform the following tasks as service account and relieve you of lots of permission-related conflicts.
  5. On the new console window (running under "myDomain\John Doe"), go to the following path "C:\Progra~1\common files\Microsoft Shared\Web Server Extensions\12\bin\".
  6. Run stsadm -o deleteconfigdb
  7. Run stsadm -o setconfigdb -connect -databaseserver "myDatabaseServer" -databasename "SharePoint_Config" -farmuser "myDomain\John Doe" -farmpassword ""
  8. Run stsadm -o setadminport 13311.
  9. Run Configuration Wizard to re-install the Central Admin site.

::Method B
  1. Backup current config database. Create a new database with the desired name (i.e., SharePoint_Config) and restore from the database backup of the original config database.
  2. Run the SharePoint Products and Technologies Configuration Wizard on the server that hosts Central Admin Site.
  3. Disjoin from the current config database (current farm).
  4. Run the Configuration Wizard again and join an existing farm by specifying the database server name ("myDatabaseServer") and the new config database name ("SharePoint_Config").
  5. Run the Configuration Wizard again. Choose the option that the machine (server) will continue to host the web site.
  6. On the next window, you will see the URL of the Central Admin Site listed as (http://mysharepoint:13311/). Click Next.
  7. After the Wizard completes, you should have the Central Admin site come up automatically(http://mysharepoint:13311/).


Thursday, July 2, 2009

Updates Resource Center for SharePoint Products and Technologies


Updates to the SharePoint Products and Technologies become available periodically. To successfully plan for and deploy these updates, use the process outlined in the Deployment Roadmap for Updates and in the articles linked to from the roadmap.

http://technet.microsoft.com/en-us/office/sharepointserver/bb735839.aspx