Wednesday, May 25, 2016

Excel Services - The workbook cannot be opened

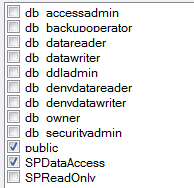
After embedding excel file via Excel Web Access webpart, an error "The workbook cannot be opened." may occur if the service account running the Excel Service Application has not been granted access to the SharePoint web application yet properly.

The powershell script below will handle permission to SharePoint Web Application for the service account.

# Service Application that runs Excel Service Application is "Contoso\SPAppPool"
#
$web = Get-SPWebApplication -Identity "https://sp.contoso.edu"
$web.GrantAccessToProcessIdentity("Contoso\SPAppPool")

In fact, what happens as a result of executing this script at the database level is that

  1. The Excel Service Account (Contoso\SPAppPool) is granted  custom database role, "SPDataAccess", which basically provides READ access to all SharePoint objects.
  2. If there are multiple content databases under https://sp.contoso.edu Web Application, then the database role, "SPDataAccess" will be granted to the Service Account on all content databases.

Tuesday, May 24, 2016

Office Web Apps Server for SharePoint 2013

Here's a quick reminder about Office Web Apps for SharePoint 2013 (detail link)

There are basically three (3) steps to set up Office Web Apps.
  • Step 1: Install pre-requisites
  • Step 2: Install Office Web Apps and configure it
  • Step 3: Have SharePoint 2013 server join Office Web Apps Server.
Below is Powershelll script to set up a Office Web Apps Server in a dev SharePoint environment. Office Web Apps server is configured as a single server with HTTPS.

Step 1: Install pre-requisites via PowerShell:
Add-WindowsFeature Web-Server,Web-Mgmt-Tools,Web-Mgmt-Console,Web-WebServer,Web-Common-Http,Web-Default-Doc,Web-Static-Content,Web-Performance,Web-Stat-Compression,Web-Dyn-Compression,Web-Security,Web-Filtering,Web-Windows-Auth,Web-App-Dev,Web-Net-Ext45,Web-Asp-Net45,Web-ISAPI-Ext,Web-ISAPI-Filter,Web-Includes,InkandHandwritingServices,NET-Framework-Features,NET-Framework-Core,NET-HTTP-Activation,NET-Non-HTTP-Activ,NET-WCF-HTTP-Activation45


Step 2: Install Office Web Apps Server 2013 and Configure it via PowerShell.
# Install Office Web Apps Servers.
# Import SSL certificate via IIS
# (Script below uses an wildcard SSL with friendly name "*.contoso.edu")
# Then run the following on the Office Web Apps Server.
# "SQLWopi.contoso.edu" is the FQDN of the Office Web Server
# -ExternalUrl is only relevant if the server will be exposed to
# public-facing internet)
#
New-OfficeWebAppsFarm -InternalUrl "https://SQLWopi.contoso.edu" -ExternalUrl "https://SQLWopi.contoso.edu" -CertificateName "*.contoso.edu" -EditingEnabled


Step 3: Connect SharePoint 2013 server to Office Web Apps Server
# Run the following Powershell script on the SharePoint 2013 server.
#
New-SPWOPIBinding -ServerName "SQLWopi.contoso.edu"

Wrap Text in PRE tag

In order to wrap text in a <pre> tag, one can use the following:
<style>
  pre {
      white-space: pre-wrap;       /* Since CSS 2.1 */
      white-space: -moz-pre-wrap;  /* Mozilla, since 1999 */
      white-space: -pre-wrap;      /* Opera 4-6 */
      white-space: -o-pre-wrap;    /* Opera 7 */
      word-wrap: break-word;       /* Internet Explorer 5.5+ */
  }
</style>

Monday, May 23, 2016

Copy SharePoint List Items To Another Identical List

The following Powershell script could be useful while importing data into existing list. If such need arises, one can import data from spreadsheet into a new list and then copy its list items to the destination list.

Keep in mind though: ReadOnly fields, such as [CreatedDateTime] or [LastUpdatedDateTime] field, cannot be manipulated through the script below.
try
{
    $web = Get-SPWeb "http://site"

    $sList = $web.Lists["Movies2"]  #source-list
    $dList = $web.Lists["Movies"]   #destination-list

    Write-Host "Working on Web: "$web.Title -ForegroundColor Green

    if($sList)
    {
        Write-Host "    Working on List: " sList.Name -ForegroundColor Cyan

        $spSourceItems = $sList.Items
        $sourceSPFieldCollection = $sList.Fields

        
        foreach($item in $spSourceItems)
        {
            if($dList)
            {
                $newSPListItem = $dList.AddItem()

                #Copy all field data except Attachments
                foreach($spField in $sourceSPFieldCollection)
                {
                    if($spField.ReadOnlyField -ne $True -and $spField.InternalName -ne "Attachments")                   
                    {
                        $newSPListItem[$($spField.InternalName)] = $item[$($spField.InternalName)]
                    }
                }

                #Copy Attachments
                foreach($leafName in $item.Attachments)
                {
                    $spFile = $sList.ParentWeb.GetFile($($item.Attachments.UrlPrefix + $leafName))
                    $newSPListItem.Attachments.Add($leafName, $spFile.OpenBinary())
                }

                #Update new LisItem
                $newSPListItem.Update()
            }
            Write-Host "        Copying $($item["Name"]) completed"
        }
       
    }
    
}
catch
{
    Write-Host "Error: " $_.Exception.ToString() -ForegroundColor Red
}

Sunday, May 15, 2016

ADQuery.ReadOnly (Active Directory Query Utility)

using System;
using System.Collections;
using System.Data;
using System.DirectoryServices;
using System.DirectoryServices.ActiveDirectory;
namespace ADQuery
{
 public class ReadOnly
 {

  public enum DNObjectClass
  {
   user,
   group,
   computer
  }

  public enum DNReturnType
  {
   distinguishedName,
   ObjectGuid
  }

  public static string FriendlyDomainToLdapDomain(string friendlyDomainName)
  {
   string result = null;
   try
   {
    DirectoryContext context = new DirectoryContext(
      DirectoryContextType.Domain, friendlyDomainName);
    Domain domain = Domain.GetDomain(context);
    result = domain.Name;
   }
   catch (DirectoryServicesCOMException ex)
   {
    result = ex.Message.ToString();
   }
   return result;
  }

  public static ArrayList EnumerateDomains()
  {
   ArrayList arrayList = new ArrayList();
   Forest currentForest = Forest.GetCurrentForest();
   DomainCollection domains = currentForest.Domains;
   foreach (Domain domain in domains)
   {
    arrayList.Add(domain.Name);
   }
   return arrayList;
  }

  public static ArrayList EnumerateCatalogs()
  {
   ArrayList arrayList = new ArrayList();
   Forest currentForest = Forest.GetCurrentForest();
   foreach (GlobalCatalog globalCatalog in currentForest.GlobalCatalogs)
   {
    arrayList.Add(globalCatalog.Name);
   }
   return arrayList;
  }

  public static ArrayList EnumerateDomainControllers()
  {
   ArrayList arrayList = new ArrayList();
   Domain currentDomain = Domain.GetCurrentDomain();
   foreach (DomainController domainController in currentDomain.DomainControllers)
   {
    arrayList.Add(domainController.Name);
   }
   return arrayList;
  }

  public ArrayList EnumerateOU(string OuDn)
  {
   ArrayList arrayList = new ArrayList();
   try
   {
    DirectoryEntry directoryEntry = new DirectoryEntry("LDAP://" + OuDn);
    foreach (DirectoryEntry directoryEntry2 in directoryEntry.Children)
    {
     string text = directoryEntry2.Path.ToString();
     arrayList.Add(text.Remove(0, 7));
     directoryEntry2.Close();
     directoryEntry2.Dispose();
    }
    directoryEntry.Close();
    directoryEntry.Dispose();
   }
   catch (DirectoryServicesCOMException ex)
   {
    arrayList.Add("An Error Occurred: " + ex.Message.ToString());
   }
   return arrayList;
  }

  public static bool Exists(string objectPath)
  {
   bool result = false;
   if (DirectoryEntry.Exists("LDAP://" + objectPath))
   {
    result = true;
   }
   return result;
  }

  public ArrayList AttributeValuesMultiString(
    string attributeName, string objectDn, ArrayList valuesCollection, bool recursive)
  {
   DirectoryEntry directoryEntry = new DirectoryEntry(objectDn);
   PropertyValueCollection propertyValueCollection = directoryEntry.Properties[attributeName];
   IEnumerator enumerator = propertyValueCollection.GetEnumerator();
   while (enumerator.MoveNext())
   {
    if (enumerator.Current != null)
    {
     if (!valuesCollection.Contains(enumerator.Current.ToString()))
     {
      valuesCollection.Add(enumerator.Current.ToString());
      if (recursive)
      {
       this.AttributeValuesMultiString(attributeName, 
         "LDAP://" + enumerator.Current.ToString(), valuesCollection, true);
      }
     }
    }
   }
   directoryEntry.Close();
   directoryEntry.Dispose();
   return valuesCollection;
  }

  public string AttributeValuesSingleString(string attributeName, string objectDn)
  {
   DirectoryEntry directoryEntry = new DirectoryEntry(objectDn);
   string result = directoryEntry.Properties[attributeName].Value.ToString();
   directoryEntry.Close();
   directoryEntry.Dispose();
   return result;
  }

  public static ArrayList GetUsedAttributes(string objectDn)
  {
   DirectoryEntry directoryEntry = new DirectoryEntry("LDAP://" + objectDn);
   ArrayList arrayList = new ArrayList();
   foreach (string text in directoryEntry.Properties.PropertyNames)
   {
    string text2 = directoryEntry.Properties[text].Value.GetType().ToString();
    string text3 = string.Empty;
    if (!directoryEntry.Properties[text].Value.GetType().IsArray)
    {
     text3 = directoryEntry.Properties[text].Value.ToString();
    }
    if (text == "objectGUID")
    {
     Guid guid = new Guid((byte[])directoryEntry.Properties[text].Value);
     text3 = guid.ToString();
     text3 = text3 + "(" + directoryEntry.Guid.ToString() + ")";
    }
    if (text == "objectSID")
    {
     Guid guid = new Guid((byte[])directoryEntry.Properties[text].Value);
     text3 = guid.ToString();
     text3 = text3 + "(" + directoryEntry.Guid.ToString() + ")";
    }
    if (text == "memberOf")
    {
     ArrayList arrayList2 = new ArrayList((object[])directoryEntry.Properties[text].Value);
     ReadOnly readOnly = new ReadOnly();
     foreach (object current in arrayList2)
     {
      string text4 = (string)current;
      text3 = text3 + "" + text4 + "";
      text3 = text3 + " (objectGuid = " + readOnly.ConvertDnToGuid(text4) + ")";
     }
    }
    if (text == "member")
    {
     ArrayList arrayList2 = new ArrayList((object[])directoryEntry.Properties[text].Value);
     ReadOnly readOnly = new ReadOnly();
     foreach (object current in arrayList2)
     {
      string text4 = (string)current;
      text3 = text3 + "" + text4 + "";
      text3 = text3 + " (objectGuid = " + readOnly.ConvertDnToGuid(text4) + ")";
     }
    }
    arrayList.Add(string.Concat(new string[]
    {
     text,
     ", type = ",
     text2,
     ", value = ",
     text3,
     ""    
     }));
   }
   return arrayList;
  }

  public DataTable GetADUserAttributes(string objectDN)
  {
   DataTable result;
   if (!DirectoryEntry.Exists("LDAP://" + objectDN))
   {
    result = null;
   }
   else
   {
    try
    {
     DirectoryEntry directoryEntry = new DirectoryEntry("LDAP://" + objectDN);
     SearchResult searchResult = new DirectorySearcher(directoryEntry)
     {
      Filter = "(&(objectCategory=Person)(objectClass=user)))",
      SearchScope = SearchScope.Subtree
     }.FindOne();
     DataTable dataTable = new DataTable();
     dataTable.Columns.Add("CN");
     dataTable.Columns.Add("displayName");
     dataTable.Columns.Add("employeeID");
     dataTable.Columns.Add("givenName");
     dataTable.Columns.Add("sn");
     dataTable.Columns.Add("sAMAccountName");
     dataTable.Columns.Add("sAMAccountType");
     dataTable.Columns.Add("telephoneNumber");
     dataTable.Columns.Add("UserAccountControl");
     dataTable.Columns.Add("UserPrincipalName");
     dataTable.Columns.Add("extensionAttribute1");
     dataTable.Columns.Add("primaryGroupID");
     dataTable.Columns.Add("mail");
     dataTable.Columns.Add("whenChanged");
     dataTable.Columns.Add("whenCreated");
     dataTable.Columns.Add("ObjectGUID");
     DataRow dataRow = dataTable.NewRow();
     directoryEntry.Close();
     result = dataTable;
    }
    catch
    {
     throw new DirectoryServicesCOMException("There was an error searching for user in AD");
    }
   }
   return result;
  }

  public string GetDistinguishedName(string sAMAccountName, string LdapDomain)
  {
   string result = string.Empty;
   string text = "LDAP://" + LdapDomain;
   DirectoryEntry directoryEntry = new DirectoryEntry(text);
   DirectorySearcher directorySearcher = new DirectorySearcher(directoryEntry);
   directorySearcher.Filter = "(&(objectClass=user)(sAMAccountName=" + sAMAccountName + "))";
   SearchResult searchResult = directorySearcher.FindOne();
   if (searchResult == null)
   {
    throw new DirectoryServicesCOMException(string.Concat(new string[]
    {
     "Cannot locate distinguishedName for ",
     sAMAccountName,
     " in ",
     text,
     "."
    }));
   }
   DirectoryEntry directoryEntry2 = searchResult.GetDirectoryEntry();
   result = "LDAP://" + directoryEntry2.Properties["distinguishedName"].Value;
   directoryEntry.Close();
   directoryEntry.Dispose();
   directorySearcher.Dispose();
   return result;
  }

  public string GetObjectDistinguishedName(
    ReadOnly.DNObjectClass dnObjectClass, ReadOnly.DNReturnType dnReturnType, 
    string objectName, string LdapDomain)
  {
   string result = string.Empty;
   string path = "LDAP://" + LdapDomain;
   DirectoryEntry directoryEntry = new DirectoryEntry(path);
   DirectorySearcher directorySearcher = new DirectorySearcher(directoryEntry);
   switch (dnObjectClass)
   {
   case ReadOnly.DNObjectClass.user:
    directorySearcher.Filter = string.Concat(new string[]
    {
     "(&(objectClass=user)(|(cn=",
     objectName,
     ")(sAMAccountName=",
     objectName,
     ")))"
    });
    break;
   case ReadOnly.DNObjectClass.group:
    directorySearcher.Filter = string.Concat(new string[]
    {
     "(&(objectClass=group)(|(cn=",
     objectName,
     ")(dn=",
     objectName,
     ")))"
    });
    break;
   case ReadOnly.DNObjectClass.computer:
    directorySearcher.Filter = string.Concat(new string[]
    {
     "(&(objectClass=computer)(|(cn=",
     objectName,
     ")(dn=",
     objectName,
     ")))"
    });
    break;
   }
   SearchResult searchResult = directorySearcher.FindOne();
   if (searchResult == null)
   {
    throw new NullReferenceException(string.Concat(new string[]
    {
     "unable to locate the distinguishedName for the object ",
     objectName,
     " in the ",
     LdapDomain,
     " domain"
    }));
   }
   DirectoryEntry directoryEntry2 = searchResult.GetDirectoryEntry();
   switch (dnReturnType)
   {
   case ReadOnly.DNReturnType.distinguishedName:
    result = "LDAP://" + directoryEntry2.Properties["distinguishedName"].Value;
    break;
   case ReadOnly.DNReturnType.ObjectGuid:
    result = directoryEntry2.Guid.ToString();
    break;
   }
   directoryEntry.Close();
   directoryEntry.Dispose();
   directorySearcher.Dispose();
   return result;
  }

  public string ConvertDnToGuid(string objectDN)
  {
   string result = string.Empty;
   if (DirectoryEntry.Exists("LDAP://" + objectDN))
   {
    DirectoryEntry directoryEntry = new DirectoryEntry("LDAP://" + objectDN);
    result = directoryEntry.Guid.ToString();
    directoryEntry.Close();
    directoryEntry.Dispose();
   }
   return result;
  }

  public static string ConvertGuidToOctetString(string objectGuid)
  {
   Guid guid = new Guid(objectGuid);
   byte[] array = guid.ToByteArray();
   string text = "";
   byte[] array2 = array;
   for (int i = 0; i < array2.Length; i++)
   {
    byte b = array2[i];
    text = text + "\\" + b.ToString("x2");
   }
   return text;
  }

  public ArrayList LogonUserGroups()
  {
   return null;
  }

  public static string ConvertGuidToDn(string guid)
  {
   DirectoryEntry directoryEntry = new DirectoryEntry();
   string nativeGuid = directoryEntry.NativeGuid;
   directoryEntry.Close();
   directoryEntry.Dispose();
   return null;
  }
 }
}

Friday, May 13, 2016

Turn on or off SharePoint Developer Dashboard

SharePoint developer dashboard can be turned on or off via Powershell script as follows
Make sure that "Usage and Health Data Collection" service application has started first under Manage Service Applications.
Add-PSSnapin "Microsoft.SharePoint.PowerShell"
$contentService = [Microsoft.SharePoint.Administration.SPWebService]::ContentService
$dashboard = $contentService.DeveloperDashboardSettings
$dashboard.DisplayLevel = "On"  # "Off" will turn off dashboard
$dashboard.Update()
After the dashboard is turned on, you will see a perfmon icon in the right upper corner of SharePoint site next to "SHARE", "FOLLOW", 'EDIT" menu items.

***In case the "Usage and Health Data Collection Proxy" has not started, use the following Powershell to start it.
$SAP = Get-SPServiceApplicationProxy | 
 where-object { $_.TypeName -eq "Usage and Health Data Collection Proxy" }

Friday, April 29, 2016

SharePoint 2013 Dev Environment Installation and Configuration

Here's a refresher on how to install and configure SharePoint 2013 dev environment.


Domain = contoso.edu
  • Domain controller  = DC01 (DNS server,  Email Server, WorkflowMgr server, too.)
  • SharePoint Server = SP13 (Database Server, too)
  • Database Server instance = SP13\SQL12 on SP13 server.
  • Service Accounts:
    • contoso\SPFarm
      • local admin to sharepoint 2013 server.
      • db_creator and security_admin roles on SQL Server instance
    • contoso\SPAppPool
      • account used for Web Application's application pool.

Prerequisite Installation

  1. Log on to SP13 as local admin
  2. Run powershell command as follows (3 lines)
  3. Import-Module ServerManager
    
    Add-WindowsFeature NET-WCF-HTTP-Activation45, NET-WCF-TCP-Activation45, NET-WCF-Pipe-Activation45
    
    Add-WindowsFeature Net-Framework-Features,Web-Server,Web-WebServer,Web-Common-Http,Web-Static-Content,Web-Default-Doc,Web-Dir-Browsing,Web-Http-Errors,Web-App-Dev,Web-Asp-Net,Web-Net-Ext,Web-ISAPI-Ext,WEB-ISAPI-Filter,Web-Health,Web-Http-Logging,Web-Log-Libraries,Web-Request-Monitor,Web-Http-Tracing,Web-Security,Web-Basic-Auth,Web-Windows-Auth,Web-Filtering,Web-Digest-Auth,Web-Performance,Web-Stat-Compression,Web-Dyn-Compression,Web-Mgmt-Tools,Web-Mgmt-Console,Web-Mgmt-Compat,Web-Metabase,Application-Server,AS-Web-Support,AS-TCP-Port-Sharing,AS-WAS-Support,AS-HTTP-Activation,AS-TCP-Activation,AS-Named-Pipes,AS-Net-Framework,WAS,WAS-Process-Model,WAS-NET-Environment,WAS-Config-APIs,Web-Lgcy-Scripting,Windows-Identity-Foundation,Server-Media-Foundation,Xps-Viewer
    
  4. Reboot SP13.
  5. Logon to SP13 as local admin
  6. Install the following prerequisites
    1. dotnetfx45_full_x86_x64.exe 
    2. MicrosoftIdentityExtensions-64.msi
    3. setup_msipc_x64.msi (Active Directory Rights Management Services Client 2.0)
    4. sqlncli.msi (SQL Server 2008 R2 Native Client Setup)
    5. Synchronization.msi (Microsoft Sync Framework Runtime v1.0 SP1 (x64)
    6. WcfDataServices.exe (WCF Data Services 5.0 (OData v3)
    7. WcfDataServices56.exe (WCF Data Services 5.6 Tools)
    8. Windows6.1-KB974405-x64.msu --> if error 0x80096002 occurs, do not install it.
    9. Windows6.1-KB2506143-x64 --> if "not-applicable-to-your-computer" error occurs, do not install it.
    10. Use command prompt as local admin and run the following (single-line):
      C:\>WindowsServerAppFabricSetup_x64.exe  /i  CacheClient,CachingService,CacheAdmin  /gac
      
    11. Install "AppFabric1.1-RTM-KB2671763-x64-ENU.exe" (Windows Server AppFabric v1.1 CU1 [KB 2671763]). If error occurs, reboot and try again.
  7. Reboot SP13.

SharePoint 2013 Installation
  1. Log on to SP13 as local admin.
  2. Mount SharePoint 2013 server iso file.
  3. Run setup.exe.
  4. Enter product key.
  5. On Server Type, select "Complete".
  6. Finish installation.
SharePoint 2013 Configuration
  1. Run SharePoint Products Configuration Wizard.
  2. Select "Create a new server farm".
  3. Specify configuration database settings
    1. Database Server = "SP13\SQL12"
    2. Database Name = "SharePoint_Config
    3. Username = contoso\spfarm
  4. Specify port number: 13311
  5. Select NTLM
  6. Do not use configuration wizard when "Welcome" page opens. Click Cancel.
  7. Change auto-generated Central Admin Content database name if needed as follows..
    1. Run the following powershell script in SharePoint Management Shell.
      $db = Get-SPContentDatabase -WebApplication "http://sp13:13311"
      Dismount-SPContentDatabase $db
      
    2. Rename the database in SQL Management Studio from "SharePoint_AdminContent_d95a4420-b726-4a73-a433-df83a2058890" to "SP13_AdminContent"
    3. User powershell to re-mount the database:
      Mount-SPContentDatabase "SP13_AdminContent" -DatabaseServer "SP13\SQL12" 
      -WebApplication "http://sp13:13311"

  8. Provision Usage and Health Data Collection Service Application
  9. $UsageService = Get-SPUsageService
    New-SPUsageApplication -Name "Usage Service Application" -DatabaseServer "SP13\SQL12" 
     -DatabaseName "SP13_UsageService" -UsageService $UsageService
    
  10. Provision State Service Application
  11. New-SPStateServiceDatabase -Name "SP13_StateService" |New-
    SPStateServiceApplication -Name "State Service" | New-
    SPStateServiceApplicationProxy -DefaultProxyGroup
    
  12. Provision Subscription Settings Service Application (required for SharePoint App)
  13. $Account = New-SPManagedAccount
    ##Enter "contoso\SPAppPool" with password on prompt.##
    
    $AppPool = New-SPServiceApplicationPool -Name
     "SP_ServiceApplicationDefaultAppPool" -Account $Account
    
    $App = New-SPSubscriptionSettingsServiceApplication 
     -ApplicationPool $AppPool -Name "Subscription Settings Service" 
     -DatabaseName "SP13_SubscriptionSettingsService"
    
    New-SPSubscriptionSettingsServiceApplicationProxy -ServiceApplication $App
    
  14. Provision App Management Service Application (required for SharePoint App)
  15. $Account = Get-SPManagedAccount "Contoso\SPAppPool"
    ## If not found, try creating a new one via "New-SPManagedAccount" ##
    
    $AppPool = New-SPServiceApplicationPool -Name 
      "AppMgmtServiceAppPool" -Account $Account
    
    $App = New-SPAppManagementServiceApplication 
      -ApplicationPool $AppPool -Name "App Management Service Application"
      -DatabaseName "SP13_AppMgmtService"
    
    New-SPAppManagementServiceApplicationProxy -ServiceApplication $App
    
  16. (Optional) Provision Search Service Application
    Important: Not recommended for dev environment. Search Service Application will make the single-server dev environment very very slow.  It is not recommended to configure and run Search Service Application for dev environment.
    $AppPool = Get-SPServiceApplicationPool 
     -Identity "SP_ServiceApplicationsDefaultAppPool"
    
    $ServerName = (Get-ChildItem env:computername).Value
    $ServiceAppName = "Search Service"
    $DatabaseName = "SP13_SearchService"
    Start-SPEnterpriseSearchServiceInstance $ServerName
    Start-SPEnterpriseSearchQueryAndSiteSettingsServiceInstance $ServerName
    
    $App = New-SPEnterpriseSearchServiceApplication -Name $ServiceAppName 
     -ApplicationPool $AppPool -DatabaseName $DatabaeName
    New-SPEnterpriseSearchServiceApplicationProxy -Name "$ServiceAppName Proxy" 
     -SearchApplication $App
    
    $clone = $App.ActiveTopology.Clone()
    $Instance = Get-SPEnterpriseSearchServiceInstance
    
    New-SPEnterpriseSearchAdminComponent -SearchTopology $clone 
     -SearchServiceInstance $Instance
    
    New-SPEnterpriseSearchContentProcessingComponent -SearchTopology $clone 
     -SearchServiceInstance $Instance
    
    New-SPEnterpriseSearchAnalyticsProcessingComponent -SearchTopology $clone
     -SearchServiceInstance $Instance
    
    New-SPEnterpriseSearchCrawlComponent -SearchTopology $clone 
     -SearchServiceInstance $Instance
    
    New-SPEnerpriseSearchIndexComponent -SearchTopology $clone 
     -SearchServiceInstance $Instance
    
    New-SPEnterpriseSearchQueryProcessingComponent -SearchTopology $clone
     -SearchServiceInstance $Instance
    
    $clone.Activate()
    
    
  17. Configure the Outgoing e-mail server information
    1. In Central Admin site, go to System Settings
    2. Click Configure outgoing e-mail settings
    3. On the Outgoing E-Mail Settings page
      1. Outbound SMTP server = dc01.contoso.edu
      2. From address = "sharepoint@contoso.edu"
  18. Create a Web Application
    1. Central Admin --> Application Management --> Web Application --> Manage Web Applications
    2. Click New
    3. Under Create New Web Application
      1. Select "Create a new IIS web site" 
        1. Name = SharePoint - 80
        2. Port = 80
        3. Path = (default) C:\inetpub\wwwroot\wss\VirtualDirectories\80
      2. Allow Anonymous = No
      3. Use Secure Sockets Layer (SSL) = No
      4. Enable Windows Authentication = checked
        1. Integrated Windows Authentication (checked) = NTLM
      5. Default Sign In Page (selected)
      6. Url = http://sp13:80/
      7. Zone = Default
      8. Create a new application pool
        1. application pool name = SharePoint - 80
        2. security account for this application pool
          1. Configurable
            1. contoso\SPAppPool
      9. Database Server = SP13\SQL12
      10. Database Name = SP13_Content
      11. Database authentication = Windows authentication (recommended)
      12. Service Application Connections = default
      13. Click [OK].
  19. Create Managed Metadata Service Application
    1. Central Admin --> Manage Service Application 
    2. Click [New]
    3. Click "Managed Metadata Service Application"
      1. Name = "Managed Metadata Service"
      2. Database Server = "SP13\SQL12"
      3. Database Name = "SP13_ManagedMetadataService"
      4. Windows Authentication (checked)
      5. New application pool name = "ManagedMetadataServiceAppPool"
      6. Security Account = configurable (checked): contoso\SPAppPool.
    4. Click [OK].
  20. Create User Profile Service Application
    1. Managed Metadata Service Application instance above (#15) is prerequisite to the User Profile Service Application. Make sure Managed Metadata Service Application has been created.
    2. Reboot SP13 (recommended) or restart SharePoint Timer Services.
    3. Log on as Contoso\SPFarm. Important!
    4. Right-click on IE and run IE as local admin. 
    5. Go to http://sp13:13311.
    6. Go to Manage Services on Server.
    7. Click "Start" link on User Profile Service. This should start really quick.
    8. Go to Manage Service Applications.
    9. Click [New] from the ribbon menu. 
    10. Select "New User Profile Service Application".
      1. Name = "User Profile Service Application"
      2. New app pool name = "UserProfileServiceAppPool"
      3. security account for app pool = configurable (Contoso\SPFarm)
      4. Profile Database:
        1. Database Server = SP13\SQL12
        2. Database Name = SP13_UserProfileService_Profile
        3. Database authentication = Windows auth
      5. Synchronization Database:
        1. Database Server = SP13\SQL12
        2. Database Name = SP13_UserProfileService_Sync
        3. Database authentication = Windows auth
      6. Social Tagging Database:
        1. Database Server = SP13\SQL12
        2. Database Name = SP13_UserProfileService_Social
        3. Database authentication = Windows auth
      7. Profile Synchronization Instance = SP13
      8. My Site Host URL = (skip this for now)
      9. My Site Managed Path = (skip this for now)
      10. Site Naming Format = User name (resolve conflicts by using domain_username)
      11. Default Proxy Group = Yes
      12. Click [Create].
    11. After successful creation of User Profile Service Application, reboot SP13 (recommended) or at least restart SharePoint Timer Service.
    12. Log on to DC01 server as domain admin.
    13. Assign "Replicating Directory Change" permission to contoso\spfarm account.
      1. Run "Active Directory Users and Computers" on DC01 as domain admin (Contoso\Administrator).
      2. Right-click the domain (contoso.edu) and select Delegate Control.
      3. Click [Next]. Click [Add]. 
      4. Enter SPFarm. Click [Check Names]. Click [OK].
      5. Click [Next]. 
      6. On the "Tasks to Delegate" page, select "Create a custom task to delegate" radio button. Click [Next].
      7. On the "Active Directory Object Type" page, 
        1. Select "This folder, existing objects in this folder, and creation of new objects in this folder" radio button. Click [Next].
      8. On the "Permissions" page, scroll down and select "Replicating Directory Changes". Click [Next]. Click [Finish].
    14. Log on to SP13 server as Contoso\SPFarm.
    15. Run IE as local admin. Go to "http://sp13:13311".
    16. Go to Manage Services on Server.
    17. Locate User Profile Synchronization Service. Click Start link.
    18. Enter SPFarm's password. Click OK.
    19. User Profile Synchronization Service is a pre-requisite for User Profile Service Application. Without it, User Profile Service Application cannot have any connections to the AD at all. 
    20. If User Profile Synchronization Service is stuck in Starting, 
      1. Restart SharePoint Timer Service and check again. Repeat a few times.
      2. We have to make sure both "User Profile Service" and "User Profile Synchronization Service" are in Started status. If "User Profile Synchronization Service" is stopped, start it. Enter credential of "contoso\spfarm" account on the next page. It may take several minutes to start the User Profile Sync Service.
        If it is stuck on Starting, restart the SharePoint Timer Service or Reboot (recommended). If still stuck on "Starting" status,  use the following PowerShell to stop the service and repeat this step to start it. Often enough, it takes more than a couple of trials of start - stop - start - stop until it finally starts. (source)
        #First, get GUID of the User Profile Synchronization Service 
        Get-SPServiceInstance | Where { $_.TypeName -like "User Profile Synchronization*"} | Select TypeName, Id
        #Then copy the Id value and paste it on the next command.
        Stop-SPServiceInstance [id-value]
      3. If all repeated efforts fail, we need to delete User Profile Service Application and start over its configurations.
    21. If User Profile Synchronization Service successfully started,  go to "Manage Profile Service" page by clicking "User Profile Service Application" in Service Applications Page and start setting up Profile Sync Settings.
    22. Configure SharePoint Profile Sync
      1. Go to "Manage Service Application"
      2. Click "User Profile Service Application"
      3. On "Manage Profile Service" page, click "Configure Synchronization Connections" and "Create New Connection".
        1. Connection Name = Contoso_AD
        2. Type = Active Directory
        3. Forest Name = contoso.edu
        4. Connection Settings
          1. Auto discover domain controller (checked)
          2. Authentication Provider Type = Windows Authentication
          3. Account name = contoso\spfarm
          4. port = 389
        5. Containers: Users directly below CONTOSO
      4. Click [OK].
      5. Go to "Manage Profile Service" page.
        1. Go to "Manage User Properties".
        2. Edit mapped attributes of the following:
          1. Work Email
            1. Direction = Import
            2. Attribute = mail
          2. Picture (optional)
            1. Direction = Export
            2. Attribute = thumbnailPhoto
            3. Description: Upload a photo to help others easily recognize you at meetings and events. Your picture will show up for contacts in Outlook and Lync as well as in different parts of SharePoint, but it may take a day or so to sync your changes with all of these systems.
          3. SIP Address (optional)
            1. Direction = Import
            2. Attribute = msRTCSIP-PrimaryUserAddress
        3. Find "Work Email". Click and Select [Edit].
        4. Go to "Add New Mapping" section 
          1. Manually enter Attribute = mail  and click [Add].
          2. Click [OK]. This will map mail field in AD to Work Email in User Profile Synchronization Properties.
      6. Go to Manage Profile Service page. 
        1. Click "Start Profile Synchronization"
        2. Choose "Start Full Synchronization". Click [OK].
    23. Go to "Services on Server". 
    24. If "User Profile Synchronization Service" is not in "Started" status, Click [Start] link on "User Profile Synchronization Service".
    25. Enter password for selected account name (contoso\SPFarm).
    26. Wait for ~5 min. Monitor activities on Task manager until activities slows down. 
    27. Check if status of "User Profile Synchronization Service" is in "Started".
  21. Create a new web application
    1. Create a new IIS web site: Name = SharePoint - 80
    2. Port = 80
    3. Take all default options. Click OK.
  22. Create a new Site Collection using URL http://sp13. 
  23. Install and hMailServer on DC01 server and add new domain for contoso.edu. Set up email accounts for spfarm and other SharePoint users in the active directory.
  24. Install and set up email client like Mozilla Thunderbird to test email accounts.
  25. Install Visual Studio as needed on SharePoint server.